Have I mentioned that I DO NOT Like Cold weather? Well I do. For 1, I have rotory cuff damage in my right shoulder and starting to get it in my left. All the Perks of being in a wheelchair. The ups and downs of medical problems on the constant uprise.
So my joints are ALWAYS hurting. Can't get a good night sleep, always up and down. But the MAIN Reason I DO NOT Like the Cold weather is it's hard for me to get around being in a wheelchair.
The snow, I get stuck in, I can't shouvle very well on the ramp, deck and sidewalk so it limits my ability to go anywhere during the colder months expecially when it snows.
I also can not get out in my workshop to do some work, for anyone interested, I have a Blog and a Facebook page here. Blog ==> Handi's Workshop and Handi's Workshop Official Facebook Page.
This is where I document my Projects and all when I have time to do them. So come take a gander at what I do.
Showing posts with label Woodworking. Show all posts
Showing posts with label Woodworking. Show all posts
Monday, November 30, 2015
Wednesday, December 3, 2008
Special Broadcast - Boy Meets Woodworking
Hello everyone,
This is a Special Broadcast that I will be broadcasting Today this evening with my Son.
I have my workshop listed on TWW Live, if you want to come check me out and my Son.
He Received a Wooden Bi-Plane project for his 8th Birthday, and I've decided to do a Special Broadcast with my Son on the arts of woodworking, This will also be the opening Project for my Workshop Blog.
So if anyone is interested in a little 1 on 1, Son and Father Broadcast, it will be airing and recording at about 5.30p eastern time, you can get to my Live feed at one of the following Links.
http://www.ustream.tv/channel/handi%27s-workshop
http://handisworkshop.blogspot.com
http://thewoodwhisperer.com/live
Hope to see everyone there.
Handi
Wednesday, October 29, 2008
A Little of This and That Etsy Store!
Come one, Come all, Come check out one and all I have at the "A Little of This and That Etsy Store". Hopefully as my Scroll Sawing Grows, so will my Store.
But only you can make it happen. If you got the time, Come check it out. There are more Christmas Items at the moment then anything, Figured I would get ahead of the Christmas Rush and pump out a few ornaments and Christmas projects that are in the works, to keep my workload down, if there will be any.
I hope that all of my Viewers take the time to view my blog as well as pass it on to others if you think my work is good and worth the effort.
Alot of time and effort has gone into my projects, some are basic some are complex, but they are my projects and alot of elbow grease goes into my hobby to bring everyone that's watching and keeps tabs on my Projects eager to come back for more.
Sooner or later, there will be some custom content added for your veiwing pleasure and possible added to my Store. So come back and Share with your friends and family your point of view of my little blog and my little store!
Handi
Tuesday, October 21, 2008
Scroll Saw Blades!
Sorry for no post the last few days, I have been Searching for patterns while waiting on my new Blades to Arrive from Mikes Workshop, He has a very generous Supply. And I've decided to give him a try because he was prompt with answering my questions in email, and have directed me in the right direction on which blades to try and all.
So I'm waiting for my blades to Arrive so I can get started on some of my Patterns that require smaller blades then what I have available currently. Unfortunately, all I have are Craftsman blades, which don't get me wrong, they give you a pack of blades, no #'s on them, just the T.P.I and what they are good for. This ok, but not helpful, when you are doing a Pattern that requires say a #3 Blade. And craftsman dont' classify their blades by the # system.
So most of the blades that I have, well, work pretty well for the "Bigger" Patterns, but the more intrcate Detail, less then a 1/16 Diameter hole for tight cutouts and corners, these won't cut it. Literely. So while I wait impatiently and excidedly for my new blades to arrive, I've been reviewing my Pattern Stash in Adobe Format "PDF" and Printing some off and Glueing them to my Oak Plywood, And taping up with Packing Tape.
Yeah, I Know, Packing Tape??? Well from Lots of Reading, Questions, etc. I have figured out the reason as many others has figured out the reasons for Packing Tape. I'm not sure the Reason why, But packing Tape on your patterns, will Prevent Tareout on Older Blades AND will have not have burn Marks from the blades. The Adhesive from the Tape Helps Lubercates the Blades to prevent Burn Marks.
I've also red that alot of people said that it don't work, Well, I have to Disagree with that. it does work, it does reduce friction and you end up with a nice clean cut 99% of the time. The other 1%, Well could be the Blades are Dull and or Could've been what I call in computer terms, that Apply not only to computers, but as an error in General "USER ERROR". You see, a Machine can't go wrong by it's self. There has to be a "USER" Behind the machine to turn it on to operate it.
If there isn't no one behind the Machine, well, it don't work. So, it has to be used by a "USER" For it to operate, even the R/C Models.
Handi
Wednesday, October 15, 2008
Scroll Saw and Project!


 Here is a few pictures of my New Scroll Saw.
And a Picture of Name Plates I made with it tinkering around with to get the hang of it!
Handi
Monday, October 13, 2008
New Scroll Saw!
Went to my Local Sears where I got my Craftsman 16" Scroll saw! I told them what the problem was, Good thing for me paying for 1 Year Replacement Plan, the Scroll Saw cost me about 130 Bucks. Not a Bad price for a New Scroller like myself.
Well, I thought it was a good price. Well needless to say, I used it about 2 times in the year I had it, and I Guess it was a good idea for me to use it the other day, because it went out on me, stopped working, was very annoyed with it cause I was right in the middle of a Small project, when it just stopped on me for no reason.
So I took it in for a replacement, They didn't have the same one that I bought last year, The gentleman told me that they don't carry them anymore. I liked the model I had, because it had left and right bevel to 45 Degree on either side, had a blower and a Light.
Well since they didn't carry the line of the one I previously owned, I had to go with a different one, not a big deal I Suppose. This one don't have a light, which kind of sucks, and it don't have a 45 Degree bevel to the left nor the right, which also sucks. But it does have a Cast Iron base which is a +, keep is square.
The other thing it don't have, that I'm gonna miss, is the quck blade release, there is a Hex nut that I have to untighten with a wrench, means more time away from the project.
I will Rate this Unit more as I use it and let you know how it goes with the unit and how well it works!
Handi
Friday, October 10, 2008
Antique Calendar!

Hello everyone.
Here is a Picture of a Calendar that was left here at my Home when we bought it. This will be the next project that I Will be working on once I get my Scroll saw working again.
I'm just going to replicate it with a few little modifications. For example. The Day, Month and Year will have to be done by hand and Stencils, The paper used in the calendar are thicker then standard paper, and the Names of the Month and Week were printed on, I don't have the stuff to Print the items on that long of paper.
 So There will be Some modifications done to make it Doable! I don't know the creator of this Calendar or anything, So I'm not taking credit for the original Craftsmanship.
Enjoy the Picture! Sorry bout my Table lol, Not as clean as my Shop is at the moment lol!
My Workshop (Garage) Part 3 of 3
 This is my 12" Craftsman Planer. It has helped me a lot so far with resurfacing my projects with a Smooth finish, as well as taking it down a few 16th or so to get the desired thickness, along with sanding, never forget that.
I find that when I use the Plan, I have to sand afterwords of course, but I get this embossed Line across my boards, almost like a Small Nick in the cutters, I've seen this once before on another Planer, but was unsure of what it meant, and I'm going out on a Limb here and taking a Guess that it may be a Small Nick in the blade that makes this embossed line along the boards. For Temporary, if this is the case, a Sanding with 120g should knock it down along with a little 220g afterwords to smooth out that baby's butt of a board!
 This bad boy right here is my Craftsman Scroll Saw. It's hardly been used, cept today when I was cuttingout some nameplates, and well, I'm Disapointed right now cause it quit working on me, which means i'm gonna have to take it into the shop to get fixed. Thank goodness for warrenties.
I'm Looking forward to getting it fixed soon so I can continue my Scrollsawing, I'm gonna get a litte "Board" sitting at home in the winter with nothing to do but Blog about wanting to the garage and work, and can't cause of the snow. So, once this is fixed, it will put my mind at ease, so I will have something to do in the house while the Snow falls, and I can blog bout my Scrollsawing!
 And lastly, this is my craftsman 10" Tablesaw with built in router table attachment, so I'm getting 2 tools for one basically. I have a Skil Router attached to the Attachment, it has served me well also, the only bad thing is its a 1/4" Shank, so I have to work around the Cabinet work Details and all, But the both together saves me lots of room, til i can build my Benches and my craft tables and all. This table saw also is foldeable up and moveable, which works well for me at the moment, cause I can just pick it up a little and move it outta the way.
The Drawbacks of this machine, is that the Mitergage slots are not on either side of the blade, they are on the router attachment, which makes it VERY Difficult to rip pieces, or even use a Mitered 45 Degree Cutting Sled, and the length of cutting is limited. Which also means, I'm gonna have to get me a Circular Saw with a Straight edge Cutting Guide to Ripe my longer stock.
Which isn't that big of a deal, was planning on doing anyway, it's the only way I can cut larger stock anyway, the table saw is mainly for the smaller projects.
So I Guess this works out for the best, at least for me anyway. This concludes the tour of my Shop (Garage), Hope you enjoyed it as I did, somewhat lol, more so if it was more organized, cabinets, tables, etc, but that is soon to come, so I may make a video of the Shop (Garage) Tour #2 when Things are more organized.
Thanks for Checking back on the Post.
Handi
Thursday, October 9, 2008
My Workshop (Garage) Part 2 of 3
 This here piece of machine is my Digital/Lazar Craftsman Drill press, it has done well for me as well, it has helped me with a few projects, Counter sinking, cutting circles with my Wheel Cutter Bit and helping with drilling out mortises with my spade bits.
So it's been a Wonderful tool so far, and it is a 5 Speed also forgot to mention that, and this will also be used to drill me metal for when I get my Trike started. I'm in the process of building a Trike, and you will see some of the parts laying around the Shop as you see the Tour of my Tools, and I will point them out for anyone interested!
 This is my 12" Craftsman Band saw. It's done fairly well so far, I've noticed a few things with it that isn't satisfactory. For example, the Cast Iron Table on this Model, well it's not 100% Non movable, it moves around a little from side to side, it don't want to stay square with the blade, almost like it has a Weak Bevel Adjuster.
I've tried to tighten it up as much as I can, and it still has movement. Any recommendation on this would be helpful, just email me with a few tips on how to fix it if possible!
 This is my Combo Craftsman Belt/Disc Sander. As you can see from the picture, its gotten some use on it. I need to get me one of them sander Sticks, that clean off all the stuff on the pads..
Would keep it clean for me and cheaper so I won't have to buy lots of sand paper.
Well this concludes my 2nd part of the post for the moment. Time for Supper, Since i'm the cook, I got to get it going, I will post the 3rd part when I can get around to it.
Thanks for Checking the post out, hope you enjoyed the tour so far, I know most of it is standard in a shop, but I guess it's how it's setup that counts!
Handi
My Workshop (Garage) Part 1 of 3
Here is a tour of my Shop. It's not the greatest and it's not the biggest Shop. But it's my Shop, it's basically Geared around me. Things that are movable, are movable, things that are stationary are of course, stationary. Well Temporary Stationary, as I get my Benches and tables Built, things will become more permanent.
 Anyway, First stop, My 10" Compound Sliding Miter Saw, This is a Chicago Electric (Harbor Freights) Brand. One of my Prides Possessions, My Old Lady got it for me for Christmas, I have used it a lot it seems to rip my boards to length, I do however have to Tune it up every so often to keep it square, Which isn't that big of a deal, considering that I've been cleaning them after each use to keep the dust and rust down.
My 12g Craftsman Shop Vac /House Sweeper! I just started using this vac out in my shop the other day, its mostly used inside my home, It helps with cleaning out my Bird Cages, the cracks and crannies and at the baseboards in my house. It helps a lot, and since Ive used it in my shop, I'm Happier that it's cleaner then it has been before, well from the dust anyway, not cleaner with all the junk laying around. Now if it was bigger then what it is now, I Could just suck up everything and empty it in the trash and be done with it. But unfortunately it only has a 4" Diameter hole, the cloths bags won't fit, already tried, it clogged my hose, so I had to stop.
 Sorry bout the picture, this is my 80th Anniversary Craftsman 17g Air compressor, it has served me well so far, and serve me even better once I get me some lines ran threw the walls, many inside the garage, and a few ports outside so I can air my car tires up and use my Air tools for changing my Car tires or working on my car. And hopefully when money permits I will invest in a Small sprayer so I can do bigger projects to spray lacquer and stains and whatever else can be used in a sprayer/air brush. Oh and I Also work on computers on the side, that's what them black utilities shelves are, Full of monitors, parts and some other craft items, Such as Native American Beeding Loom, over 100 Bucks worth of .4mm and .5mm Bird seed beeds and model car Air brush and stuff!
I'm not sure the posting limit here, so I'm going to end this post and continue on with another so we can cover my Whole Shop. I Have 6 more tools to post, So there will be a 3 part post to my Shop!
Handi
 Anyway, First stop, My 10" Compound Sliding Miter Saw, This is a Chicago Electric (Harbor Freights) Brand. One of my Prides Possessions, My Old Lady got it for me for Christmas, I have used it a lot it seems to rip my boards to length, I do however have to Tune it up every so often to keep it square, Which isn't that big of a deal, considering that I've been cleaning them after each use to keep the dust and rust down.
My 12g Craftsman Shop Vac
 /House Sweeper! I just started using this vac out in my shop the other day, its mostly used inside my home, It helps with cleaning out my Bird Cages, the cracks and crannies and at the baseboards in my house. It helps a lot, and since Ive used it in my shop, I'm Happier that it's cleaner then it has been before, well from the dust anyway, not cleaner with all the junk laying around. Now if it was bigger then what it is now, I Could just suck up everything and empty it in the trash and be done with it. But unfortunately it only has a 4" Diameter hole, the cloths bags won't fit, already tried, it clogged my hose, so I had to stop.
 Sorry bout the picture, this is my 80th Anniversary Craftsman 17g Air compressor, it has served me well so far, and serve me even better once I get me some lines ran threw the walls, many inside the garage, and a few ports outside so I can air my car tires up and use my Air tools for changing my Car tires or working on my car. And hopefully when money permits I will invest in a Small sprayer so I can do bigger projects to spray lacquer and stains and whatever else can be used in a sprayer/air brush. Oh and I Also work on computers on the side, that's what them black utilities shelves are, Full of monitors, parts and some other craft items, Such as Native American Beeding Loom, over 100 Bucks worth of .4mm and .5mm Bird seed beeds and model car Air brush and stuff!
I'm not sure the posting limit here, so I'm going to end this post and continue on with another so we can cover my Whole Shop. I Have 6 more tools to post, So there will be a 3 part post to my Shop!
Handi
Monday, October 6, 2008
Jewerly Box


 Well, here is pretty much my first attempt at a Semi descent Jewelry Box.
This box is about 6 or 7 years old. I Couldn't tell you what kind of stain, nor the Dimensions are, because I Also done this project on the fly.
All I Can remember and tell you about, is I Lined it with red felt, put decorative Hinges on it.
The top, well it has a 45 Degree all the way around the top to indicate a raised panel. And a Dado on the bottom to receive the bottom.
Hope you Enjoy it, I will eventually get around to finishing it, I think I'm going to Re sand it, Re stain it and then Poly it this time. Then I Will re post the Finished product!
Sorry about the Photo Alignment, They are not wanting to cooperate with me this evening.
Handi
Sunday, October 5, 2008
Toothbrush & Cup Holder - Part 2 of 2
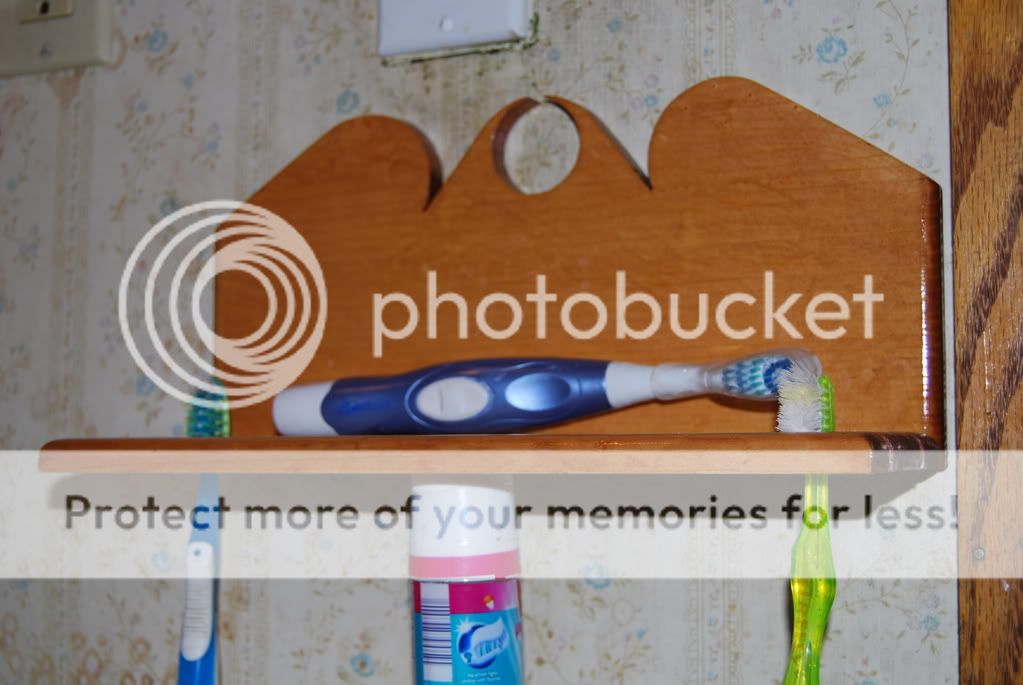 I hope that everyone really enjoyed Part 1 of my Toothbrush & Cup Holder. Yeah, Yeah, I know. How basic and easy can you get?
Well, When you are limited Financially, you have to deal with projects that's within your income range, and this is what I have done.
The Scraps was outside my garage, easy access, my tools was inside the garage, this is the end result of free wood and a little Creativity.
Anyway, on with the last part!
I Explained the proccess in the first part how I Planed it down, Drilled the Cup Holes and all!
This part will be short, just because there isn't much I Can explain about finishing.
Although, I'm not the best Finisher when it comes to Applying coats of Stain and all, But as you can see, the project at least turned out a Somewhat satisfaction, it's usable, and didn't cost me a dime!
All pieces was Sanded down to 220g, I Applied Min wax Cherry Stain, Removed after approximately 5 Minutes. Let Dry overnight and next evening I Applied a Coat of Poly.
Waited 24hrs, Then I Lightly sanded at 220g, Wiped off the residue from the sanding, and applied another coat of poly and let dry for another 24hrs. I lightly sanded at 220g once again, let dry for another 24hrs, then lightly sanded at 220g again for the last Coat of Poly.
This included 3 Coats of Poly, Giving it a Glass and water tight Finish.
Hope you enjoyed this Project, I know I did as long as it took me to finish it, and get it installed ready to use, I know me and my Ol' Lady was tired of using a Cup to sit our toothbrushes in, and cups skattered along the sink top.
This concludes my Toothbrush & Cup Holder project, it was a project made on the fly, so, there is no Plans for it.
Stay Tuned for another project soon, as my Camera is recharging, I will take another picture of a project I Done while back for you to Feast your eyes upon!
Toothbrush & Cup Holder - Part 1 of 2

Hello everyone
First off, I would like to thank everyone that has checked out my Blog since Yesterday!
Now, Lets get down to work! This is my Toothbrush & Cup Holder Project. This was made out of Old scrap wood laying around my Garage (outside, matter fact), it was a broken 1x12 about 12" long.
I Squared the 2 Pieces off, The I Sent them threw my Craftsman 12" Planner. The end result was 1/2" thick stock by 12" long. This allowed me to use my Wheel attachment in my Drllpress to Cut out perfect circles to hold 3 Cups (Family of 3), at 3", 6" and 9" apart.
Then it was sanded with 120g up to 220g sandpaper.
Once the bottom was finished, I routed a 1/4" Round over along the front and sides of the base.
The back, I took the base, Lined the holes at the very top of the back, Traced the circles on the very top of the back, This give me some of the design I was looking for, On the sides, measured down 3", used a Straight ruler to connect the 3" mark to the top of the Circle, I done this for both sides of the back.
For the very top Center, I used a 15/16" Impact Socket :) to make the center circle, then I Cut out my Design with my Craftsmen 10" Band saw.
Then the back was sanded with 120g up to 220g sandpaper as well.
Then lastly I Put it together, with a butt-joint and 3 - 3/4" Counter sunk Hobby Screws.
On the back of the back, I routed out 2 Keyhole Slots to Hang it on the wall.
Here is the ending Result so Far of my Project!
Subscribe to:
Posts (Atom)